Getting Started with Firestore
Overview:
- Setup Firestore, and learn to read/write data from firestore.
- Analyze how many reads and writes are performed to calculate pricing
Getting Setup
Setup Firestore
- Use an existing project, or a create a new project. Using an existing one is fine for Firestore.
- Go to Build > Firestore and click Create database

- Select “Start in test mode”. We’ll revisit security rules later.
- You can choose the default Firestore location and click Enable
- You could get a faster connection to Firestore if its location is closer to your users
- You may have legal/compliance reasons to keep data within a certain country
Configure your project
In the previous section, we configured our project to use Firebase Auth so that we could do login and logout.
In this section, we'll add integration with Firestore as our database. In order to demo the Firestore functionality, we'll create a simple web page to read/write some data.
I've put an example repo on CodeSandbox - similar to Codepen.io but meant for NextJS (and other similar) projects.
Some important files:
src/index.jsis a hello world NextJS project with the landing page content removed.
src/components/PostsList.js contains the React component for a Post widget - a way for us to create/read/update some data from Firestore.
src/database.js is a file containing the methods you need to implement to make PostsList.js work correctly - very similar to the way
For this exercise, you’ll be editing database.js and using the app to make sure things are working.
Get your Firebase Config Information
After you initialize Firestore, grab your Firebase Config object and paste it into src/firebase.js
It looks like this:
const config = {
  apiKey: "...",
  authDomain: "...",
  projectId: "...",
  storageBucket: "...",
  messagingSenderId: "...",
  appId: "..."
};
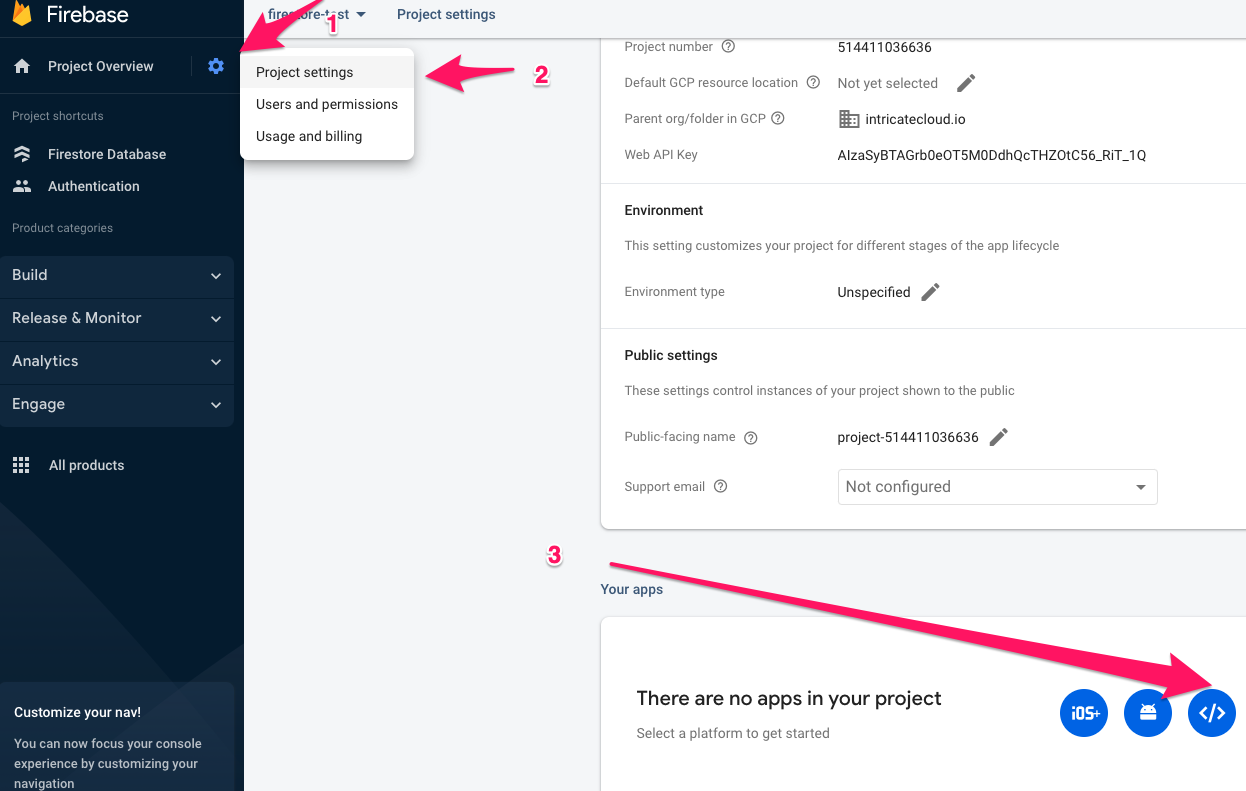
If you don’t have this yet, you’ll need to “Create a new web app” on Firebase. Go to your Project Settings and create an app
Using Firestore
Go to database.js and read through the TO-DOs. Note - all the exercises are based on making edits in that file. If you wind up using different names for your properties, they also need to be updated in App.js
The purpose of the exercise is to get you familiar with the API for reading and writing data to Firestore, along with some of its limitations as well.
Using Promises with Firestore
The whole Firestore API uses Promises, so you'll see .then((...) => { ... }) in a lot of the code snippets. When working with Firestore, its easier to read and write if you use async/await syntax. For example:
Without a return value
- Promises
- async/await
// Add a new document in collection "cities"
db.collection("cities").doc("LA").set({
    name: "Los Angeles",
    state: "CA",
    country: "USA"
})
.then(() => {
    console.log("Document successfully written!");
})
.catch((error) => {
    console.error("Error writing document: ", error);
});
try {
  // Add a new document in collection "cities"
  await db.collection("cities").doc("LA").set({
      name: "Los Angeles",
      state: "CA",
      country: "USA"
  })
  console.log('Document successfully written')
} catch (err) {
  console.error("Error writing document: ", err);
}
With a return value
- Promises
- async/await
db.collection("cities").doc("SF").get().then((doc) => {
  if (doc.exists) {
      console.log("Document data:", doc.data());
  } else {
      // doc.data() will be undefined in this case
      console.log("No such document!");
  }
}).catch((error) => {
    console.log("Error getting document:", error);
});
try {
  const doc = await db.collection("cities").doc("SF").get()
  if (doc.exists) {
    console.log("Document data:", doc.data());
  } else {
    // doc.data() will be undefined in this case
    console.log("No such document!");
  }
} catch (err) {
  console.error("Error getting document: ", err);
}
#1 Create some data
PostsList.js has a form with a username field, a name field, and a message field. The form has an onSubmit handler that will take that data and save it.
Update database.createPost(...) to take those 3 parameters and save it in Firestore.
At this point, you should be able to see your new data in the Firebase console
See “Add a document”
Notes:
- If you want to use your own IDs, you can use
.doc('some-id').set({ myData: ...}) - If you want to let Firebase create IDs for you, use
.add({ myData: ...}) - Sequential IDs can cause performance issues when using Firebase. Behind the scenes, all your data is distributed among a large fleet of servers, based on your ID. If your IDs are sequential, the data will be closer together and may wind up on the same server, causing slow downs. Random UUIDs can distribute your data amongst the servers evenly, resulting in fast reads. More info here
#2 Get data out
Once the data has been updated in Firestore, PostsList.js is configured to get the latest data, and display it.
Update database.getAllPosts() to get all the posts that have been saved in Firestore
See “Get a document” or “Get all documents in a collection”
Notes:
- In the docs,
db.collection('...').get()returns aquerySnapshot.querySnapshotis an object that contains aforEachmethod to get every document in your collection. - Unfortunately, the ONLY way to get your data out is to use
.forEach, and push all the items to a new array. - Every item in
querySnapshotis adocobject.doccontains[doc.id](http://doc.id)anddoc.data(). doc.idis the autogenerated ID that Firebase usesdoc.data()(note the parens) is the object containing all the data that you added- If you want to create an object that contains BOTH the id and the data, you’ll have to combine them:
const data = { id: doc.id, ...doc.data() }
#3 Delete the data
You can delete anything that you’ve added as long as you have the ID for that data.
Update database.deletePost(...) to delete a post with a particular ID. Make sure your post in database.getAllPosts has a post.id property.
#4 Update some data
We can update our post data with a likes counter.
Update database.likePost(...) to update a post with a specific ID, and increment the likes property.
There are 2 ways you can do this:
- Increment the value, and then update the post to set
likesto the new value- This can be problematic. Imagine this scenario
- A post has 1 like
- 2 people load the page, and both hit the Like button for the same post
- The post now has 2 likes (and not 3).
- This can be problematic. Imagine this scenario
- Tell firebase to increment a number by 1.
See “Increment a numeric value”
Notes:
- If you’re working with arrays, see Update elements in an array
- Or Update fields in nested objects
#5 Add Firebase Auth User Info
One pattern of creating data in Firebase is to attach a userId property to your data, so you can filter on it later. You can also use the name & email from your Firebase Auth info.
Update onSubmit in PostsList.js and:
- add a
userIdproperty - update the
usernameto use the email from your Firebase user - update the
nameto use the display name from your Firebase user
See “Get a user’s profile” to see what data you can get
#6 Get all your own posts
If you sign out and back in a new user, you can see all the posts created by the previous user. Let’s say we want to update the functionality so that a user should just be able to see their own posts.
Update database.getAllPosts() to get all the posts where the userId is set to your current user’s ID.
See “Simple queries”
Challenges
- How might you search for posts from another user?
Hint: You’ll have to find a way to keep track of other users and their ID or their name.
- How would you search for text across all messages? For example - search for all posts containing “John Wick”
Hint: The only query operators you have available to you are these.